Lab 1.2: Learn about the command line interface and Git/GitHub
Contents
5. Lab 1.2: Learn about the command line interface and Git/GitHub
Worksheet Contact: Xiao Wang (x.wang16@leeds.ac.uk)
This is supplementary material for students that are not familiar with Linux, the command line interface, Git and GitHub. If you are already familiar with the remaining content, you may focus your attention to lab worksheet 1.1. instead.
5.1. Worksheet Objective
This worksheet serves as an introduction to the Command Line Interface (CLI), Git, and Github.
5.2. Using the terminal
Note
If you are familiar with commands like cp, mv, cd, rm, touch and
the notion of variables like $HOME, ~ etc. You can skip this
section.
The terminal is a powerful tool that often offers finer control over a computer than a graphical user interface (GUI) equivalent. It is also significantly more flexible, and you are likely to use tools that are exclusively accessible through the terminal. ROS is an example; is exclusively a command line tool. Consequently, in this section, we will introduce fundamental command line programs.
5.2.1. What’s the terminal?
The terminal serves as an emulator for communicating with the operating system. It utilises an interpreter, referred to as the ‘shell’ which, on most Linux distributions, defaults to ‘Bash’. Through this interpreter, the terminal comprehends and conveys commands to the operating system. It equips users with a toolbox to execute various tasks on the computer, often providing privileged means to perform actions that might not be readily achievable through the graphical user interface (GUI). For instance, while the traditional method to copy-paste files involves a series of actions using the mouse, such as ‘right-click -> Copy’ to copy a file and ‘right-click -> Paste’ to place it elsewhere, the terminal streamlines this process with a single line of command:
cp $HOME/Desktop/my_program.py $HOME/Documents/
The above line is called a ‘command’ when using the terminal which follows the
format: program [arguments]. Arguments can be optional.
The command above utilises the cp program, which is short for “copy.” This
program requires two essential arguments (separated by space):
The path to the source file (the file to be copied), which is represented as
$HOME/Desktop/my_program.py.The destination directory (in Unix, folders are referred to as directories), as shown in the example as
$HOME/Documents/.
In this context, $HOME is a variable holding the full path
to our home directory, which typically is /home/username. The use of
$HOME allows for a flexible way of referencing your home
directory without specifying the exact username, making the command more
portable across different user accounts. We will talk about variables in more
detail shortly.
5.2.2. Working directory
The terminal, at any given point, is working within a specific directory of the file system, referred to as the “working directory” in Unix terminology. This working directory is where the terminal currently is, ready to execute commands.
To determine the current working directory, you can utilise the pwd program,
which stands for “print working directory”. By default, when you open the
terminal, your working directory is set to your home directory.
Give it a go now. Execute pwd in your terminal, it will display the path of
the directory you are working in. What is it?
5.2.3. Home directory
As mentioned earlier, when you open the terminal, it typically starts in your
home directory by default, unless you specify a different one. We
also mentioned that $HOME is a variable holding the path to your home
directory. To inspect the content of this variable, you can execute the following
command:
echo $HOME
The above command uses the echo program that prints something to the terminal followed
by what we want to print, in this case the content of the variable $HOME. Now
run pwd, can you verify that your current working directory is the same with
$HOME?
Another way to find the path to your home directory is by using ~. Another
variable for the home directory. Run:
echo ~
Do you get the same path?
The home directory is a “physical” directory on your computer. You can even see this directory through the GUI. In fact, we recommend that you open the file manager and go there to see the home directory. To do so, see figure the figure below:
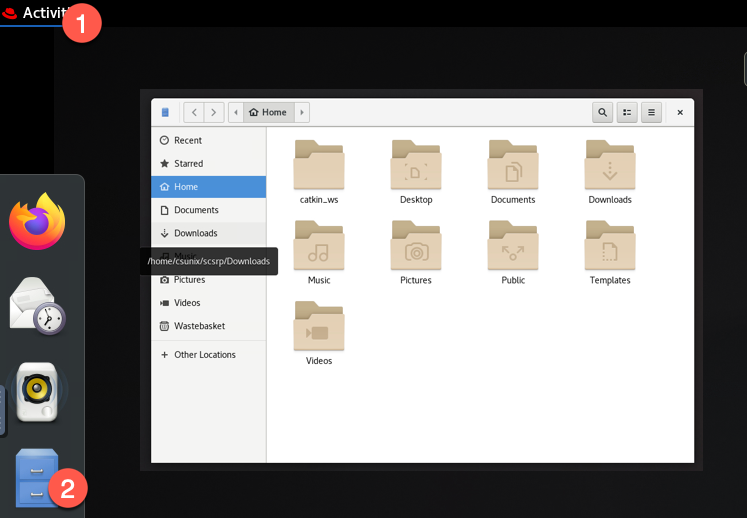
Opening the file explorer on Linux
In Linux, files and directories that begin with a period (.) at the beginning of their
names are considered hidden files or directories. By default, most file viewers
in Linux do not display these hidden files, making them invisible in the
graphical user interface (and by default in the command line).
If you want to see the hidden files in the file explorer, you can change the setting as shown below:
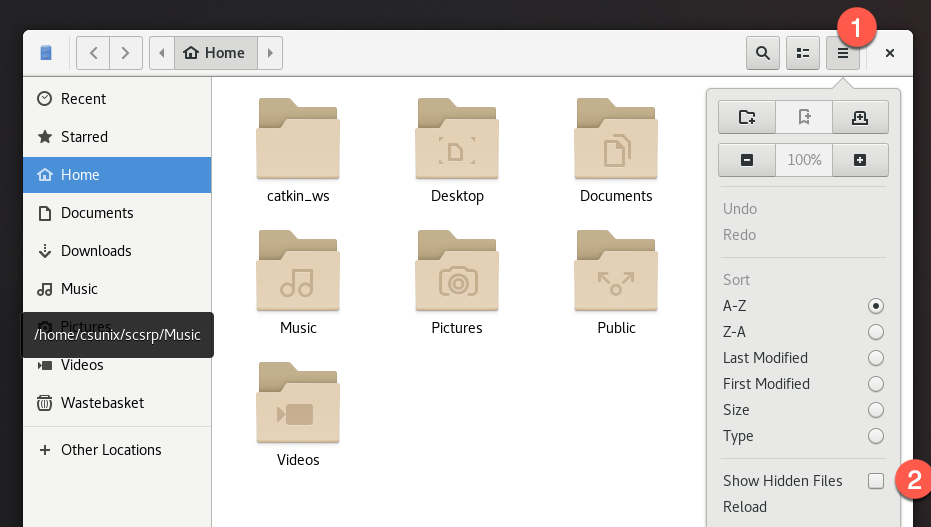
Toggling the “Show Hidden Files”.
5.2.4. Changing directory
You can change/move into a directory using the cd command (short for change
directory). Let’s try something. Run cd Documents (note that in the terminal
commands and paths are case-sensitive, so it’s Documents and not
documents). This means “change directory to Documents”. Verify that we
changed directory using pwd. Now let’s move to our
home directory. How can we do this? There are multiple ways:
cd $HOMEcd ~cd /home/rafael(obviously replacerafaelwith your username)cd
The most concise command to jump to the home directory is cd. By default, when
used without specifying a path, cd will jump to our home directory.
It’s important to note that cd can accept either the name of a directory
(e.g., cd Documents) or a full path to a directory (e.g., cd /home/rafael/Documents). In Unix, a path is a string that delineates a
location within the file system, using / to separate directories.
It’s worth emphasising that including spaces in a path can lead to issues. This
is because the terminal cannot differentiate between a space within the path
name and a separation between commands. To overcome this, you can “escape”
spaces by using the backslash character (e.g., cd Documents/my\ dir\ with\ spaces/src). However, it is generally recommended to avoid using spaces in
directory or file names. Instead, consider using underscores (_) as a substitute to spaces.
For instance, a directory could be named my_dir_with_spaces.
In addition, cd .. allows you to navigate up the directory hierarchy. Try it.
Run cd to go to the home directory. Then run cd Desktop to go to the Desktop.
Verify you are there using pwd. Now let’s say you want to go back one directory,
run cd ... Run pwd to verify you are back one directory. The .. is a shortcut
to mean the directory above the current one.
Let’s move again into Documents. Make sure you are there with pwd. Now let’s say
we want to move to the Desktop. How can we do this? Multiple ways:
cd ..(now we are in home), thencd Desktop.cd ../Desktop(we say go a step back and then to Desktop).cd ~/Desktop(since Desktop is under the home directory, we can use the~shortcut).cd $HOME/Desktopcd /home/rafael/Desktop
5.2.5. Creating new files and directories
At some point, we will want to create files and directories (folders). Let’s look at these commands next:
mkdir my_new_folder
The mkdir (short for make directory) program will create a new directory.
Note that running mkdir my new folder with spaces in the directory name will
result in three distinct directories being created: my, new, folder.
Again, if you want spaces in the name, you would want to run mkdir "my new folder" or mkdir my\ new\ folder. It’s simpler to not use spaces in the
file/directory names, just use underscores.
Now that we have a folder created, let’s move into it: cd my_new_folder.
Finally, let’s create a small Python program. To create a file run:
touch demo.py
The touch program will create an empty file. Note the .py extension to mean
that this is a Python file (that’s just a hint for text editors, so
they can provide accurate syntax highlighting, and for humans to know what to
expect from that file; the operating system don’t care if this .py contains
Python code or not).
Let’s open the file in Code and write a simple hello world program. You can open the file from the terminal:
code demo.py
Now Code should pop up with an empty file, write the following program:
1print('Hello, world!')
Save the file (CTRL + S) and close Code.
Let’s run the program:
python3 demo.py
You should see Hello, world! printed in the terminal!
5.2.6. Deleting files and directories
Warning
The following command will irreversibly delete the file or directory. Unlike when deleting files from GUI, where you have the concept of a “recycle bin”, and you can recover deleted files, executing these terminal commands will result in the permanent removal of files or directories. Consequently, exercise caution when using this command, as there is no way to recover the deleted files once the command has been executed.
For the sake of this demonstration, let’s create a new file in the my_new_folder
directory. Make sure you are in that directory by running pwd.
Then run touch test.py.
Let’s say we want to delete the test.py now. We can do so using the rm
command: rm test.py (please note that this is a permanent delete; you cannot
restore the file once the command is executed).
Let’s say we want to delete the my_new_folder directory entirely.
We need to use the rm command again.
First we need to move outside the folder, run cd .. and then:
rm -r my_new_folder
Note the -r option which tells rm to do the operation recursively, meaning
to delete all files and directories within that directory (again note that
once this operation happens the files are gone; cannot be restored).
We could have accomplished the same with a single command:
rm -r ../my_new_dolder
Note that ../my_new_folder is a relative path (meaning a step back from
where we are currently + my_new_folder).
5.2.7. Listing files
As we navigate in and out of directories, we will want to inspect their contents. Unlike when using the GUI, which typically displays directory contents as we explore, in the terminal, we need to run a specific command for this purpose:
ls
Run this command and you should see a list of files and directories in the current working directory. Should you wish to look at files within a directory of the current working directory, you can do like so:
ls Documents/some_other_directory
Therefore, ls with no arguments will just list the files/directories of
the current working directory, and if path is specified the files/directories
of the specified directory.
Finally, ls by default shows only regular files. if we want to see all files,
including hidden ones, we should use the -a flag (short for all) : ls -a.
Note
These are the very basic terminal commands you need to know. Feel free to experiment further with them. Make sure you are familiar with these commands as we will be using them throughout this module.
5.2.8. Git and GitHub tutorial
For a basic github tutorial please use this link: Git tutorial
5.3. Remarks and Checklist
Congratulations on completing this worksheet! Don’t forget to complete lab worksheet 1.1. By the end of this session, please ensure that you have achieved the following:
Familiarised yourself with basic terminal programs (e.g.,
ls,cd,pwd,rm,touch,mkdir, etc.).Gained an understanding of Git and its usage.
If you have any questions or run into any issues, please don’t hesitate to reach out for assistance. You can approach one of the Teaching Assistants during their lab hours for immediate help or feel free to contact me.