Lab 1.1: Setting up your environment
Contents
4. Lab 1.1: Setting up your environment
Worksheet Contact: Xiao Wang (x.wang16@leeds.ac.uk)
Note
This lab worksheet is essential for the module. We will be introducing ROS2 today, which is the up-to-date version of the robot operating system. ROS in general is like an eco-system for robotics related stuff, such as simulation, SLAM, navigation, control, hardware etc. It is widely used both in academia and the industry.
Please aim to complete this worksheet during week 2. The labs scheduled will offer support and guidance for this worksheet. This worksheet is formative, which means you are not required to submit any work, and it will not be graded. However, the labs will help you complete your ROS project in this module, which accounts for \(\boldsymbol{10\%}\) of your grade.
4.1. Should I complete the Supplementary Worksheet Lab 1.2?
Note that for Lab 1, we also have a supplementary worksheet here. This supplementary worksheet 1.2, introduces you to the command line interface (terminal), Git and GitHub.
If this is your first time using these tools, or you don’t have extensive experience with using the command line, please complete the supplementary worksheet first. This supplementary worksheet is a prerequisite for lab 1.1 and very important for the rest of the module (including the ROS2 project).
If you are familiar with these tools, you can skip the supplementary worksheet 1.2, and proceed with Lab 1.1. Everyone should complete the worksheet 1.1.
4.2. Aim
This worksheet serves as an introduction to ROS and Singularity. The worksheet will also walk you through configuring your Linux account for seamless interaction with this module. Everything in this worksheet is essential for you to complete and you need to set up your Linux account for this module.
4.3. Singularity
The module relies on the use of this software to run code. Please read through this section carefully.
4.3.1. What’s Singularity
Singularity is a containerisation platform, a form of operating-system-level virtualisation. These tools enable you to execute programs within isolated virtual operating system instances known as containers. The key advantage is that you can preconfigure these operating system environments to include specific software versions and dependencies, allowing you to run them on any host operating system that supports Singularity.
Consider a scenario where you need to run a program that relies on Ubuntu 18.04, but your host operating system is running Ubuntu 22.04. Perhaps you have two programs that must run simultaneously on the same computer, each with distinct operating system versions and software dependencies. In such cases, containerisation provides an effective solution, enabling you to create and manage separate, self-contained environments tailored to the requirements of each application.
4.3.2. Why we need Singularity
The tools we need for this module, such as ROS, mandate a specific version of Ubuntu that is not supported on the university computers. Consequently, we have devised a solution to deliver all these necessary tools to you via a container. Within this container, you will operate within an Ubuntu 22.04 environment, pre-installed with all the required tools for this module.
If you happen to have a computer running a Linux-based operating system, you have the option to install Singularity and download the container image directly onto your computer. This approach eliminates the need for any additional modifications on your computer, enabling you to seamlessly run the code and exercises associated with this module on your machine. If you want to download the Singularity image on your computer, please read this section of the FAQ page.
4.3.3. How to use Singularity to work in this module
To enter the Singularity environment for this module you need to run the following command in your terminal:
singularity shell --nv --bind=/run/user/$UID --bind=/etc/localtime /vol/scratch/SoC/COMP3631/comp3631.simg
Note the difference before and after running the command. Note the
[COMP3631] Singularity> prompt which indicates that you are now in singularity.
To get out of the container, hit CTRL+D. Observe that the prompt now is
not [COMP3631] Singularity> (try it now).
4.3.4. A shortcut to start singularity
Note
The .bashrc file below is a special file located in your home folder that
includes bash/shell commands (like cp, cd, declaring variables etc) that
will get executed every time a new terminal sessions starts. So, when you want
to run commands every time you open a terminal, you can include those commands
in your .bashrc file.
This is a lengthy command, however, and you will need it often; let’s create a shortcut.
Open your .bashrc file (gedit ~/.bashrc), and append the following lines
at the end of the file:
unset SESSION_MANAGER

alias ros="singularity shell $(nvidia-smi &> /dev/null && echo "--nv" || echo "") -B /run/user/$UID -B /etc/localtime /vol/scratch/SoC/COMP3631/comp3631.simg"

if [ -d /opt/ros/humble/ ]; then
    PS1="[COMP3631] Singularity> \w \$ "

    source /opt/ros/humble/setup.bash
    . /usr/share/gazebo/setup.sh

    if [ -d $HOME/ros2_ws/install/ ]; then
        source $HOME/ros2_ws/install/setup.bash
    fi

    export ROS_DOMAIN_ID=30 #TURTLEBOT3
    export TURTLEBOT3_MODEL=burger
    export ROS_LOCALHOST_ONLY=1
fi
Save the file and close it. In the terminal run source ~/.bashrc to apply
the changes to the current session. The alias line creates a named shortcut to a
longer command; running ros now will execute the lengthy singularity command
provided. The rest of the code is required for the future lab worksheets.
Type ros and hit enter now. Does
Singularity work again? If so, that’s great, use ros to enter Singularity
henceforth.
Always make sure that your terminal includes the [COMP3631] Singularity> prompt,
otherwise ROS won’t be available.
4.4. Using Visual Studio Code properly for this module
Warning
In the following section, we will guide you through the proper configuration of VS Code for Python programming. If you intend to use your own text editor, we strongly advise ensuring that your chosen editor has the capability to convert tab characters into spaces. This is a common issue when using certain text editors. Fortunately, most editors offer settings that allow you to automatically convert tabs into spaces.
4.4.1. The proper way to open VS Code for this module to benefit from ROS auto-completion
While Visual Studio Code exists as a software outside the Singularity container, we installed VS Code in the container to help you access IntelliSense and embedded terminal windows. What this means is that, if you open VS Code from within the container, VS Code will be able to provide “suggestions” and “auto completion” for ROS related commands. On top of that, you could start new terminal sessions from within VS Code, and those terminal windows would be within the singularity container (i.e., you won’t need to run the singularity command more than once if you work in terminals in VS Code).
Opening visual studio code this way requires that you are in a container cd ~/ros2_ws,
then simply run: code . the dot means open everything contained within you current directory.
Afterwards, you can use vscode as your coding IDE with all the files inside your workspace
on the left filesystem column.
So for this module, whenever you log in to a Linux computer do the following:
Open a terminal window.
Enter into the Singularity container by running:
ros(this is an alias we set up earlier). Make sure you can see the[COMP3631] Singularity>prompt.Navigate to your workspace by doing:
cd ~/ros2_ws(follow along to create your workspace)Open VS Code from there using:
code ..
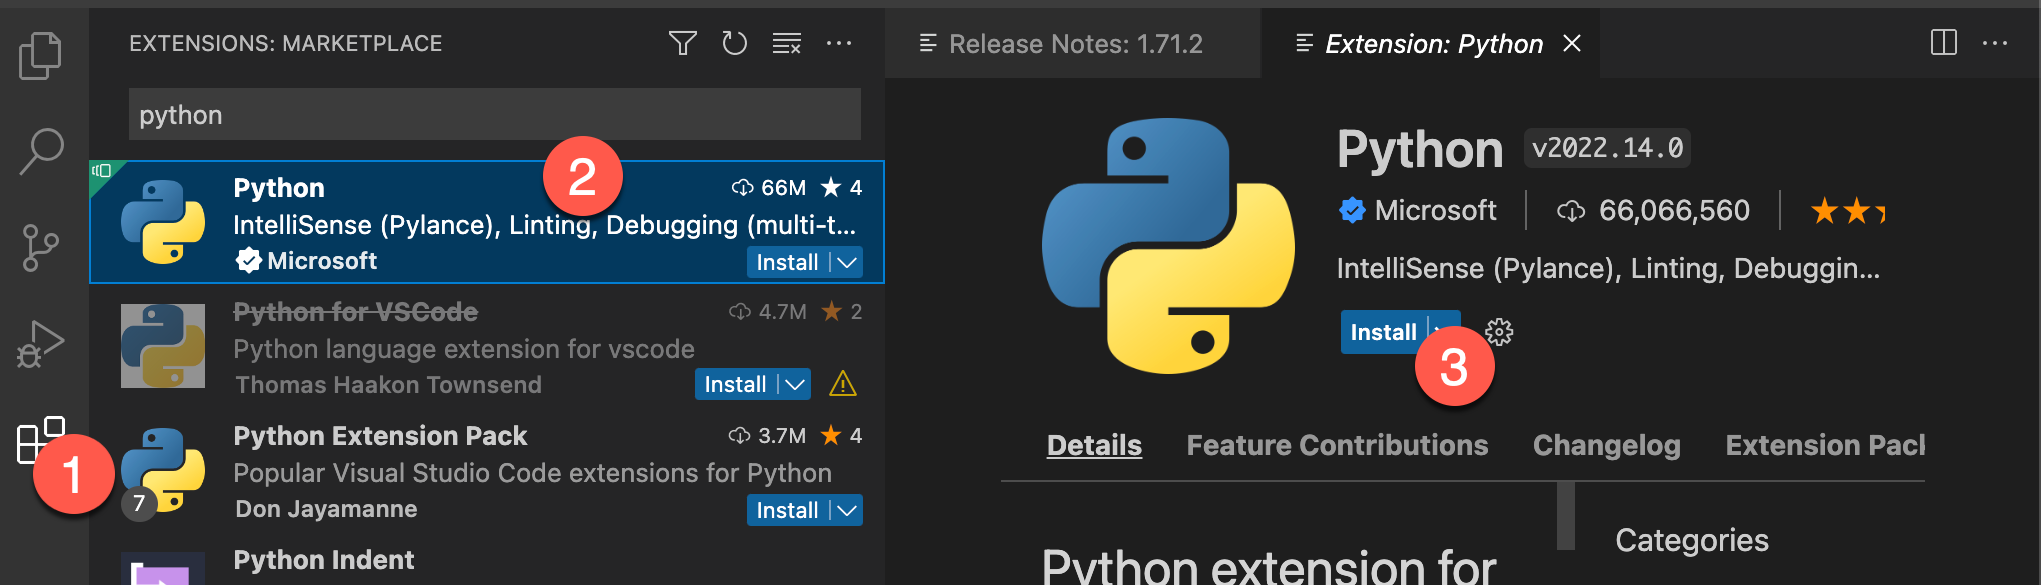
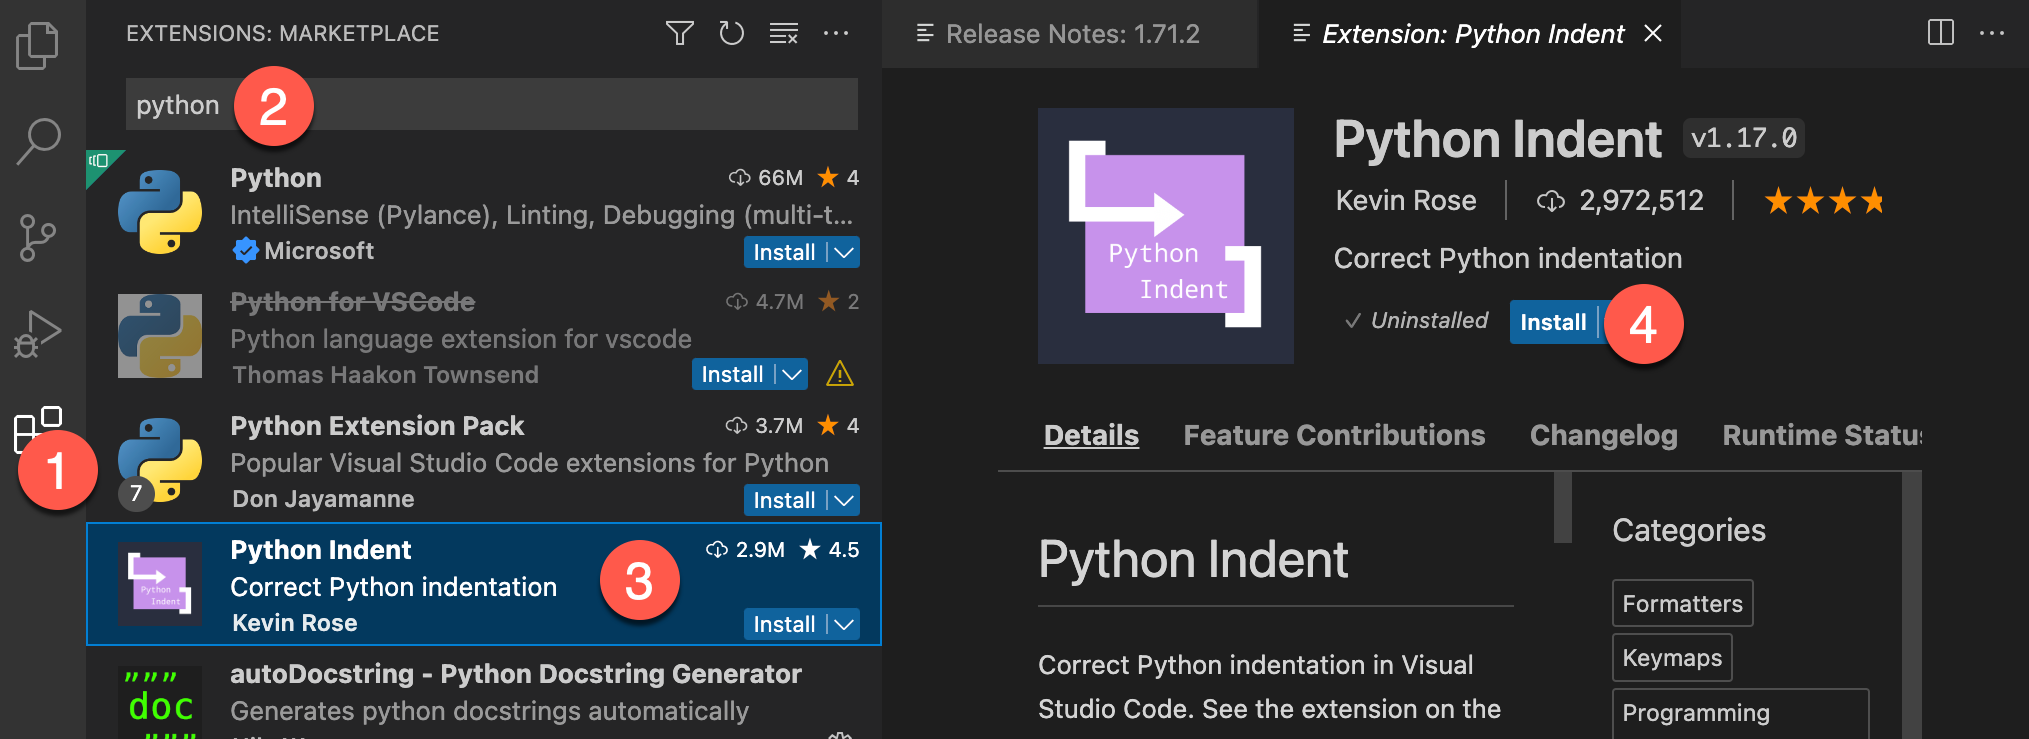
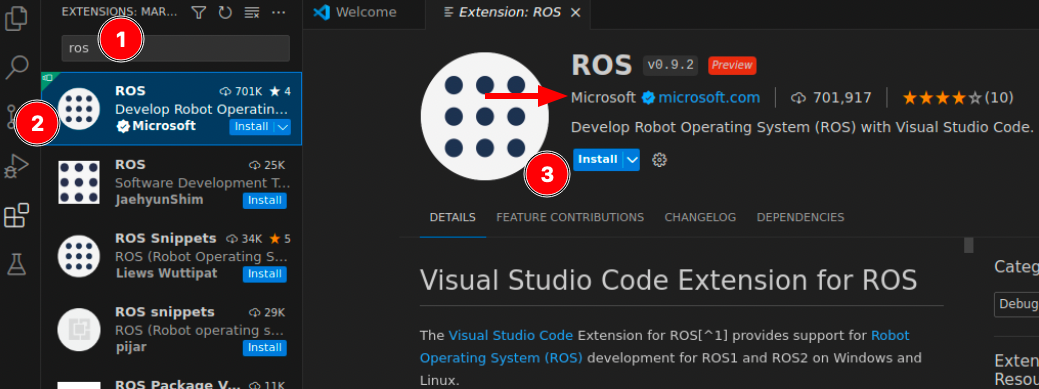
4.4.2. Install Python extensions
Now that VS Code is working, let’s install three essential extensions for Python programming:
4.4.3. Opening singularity terminal windows from within Code
Again, a benefit of using Code in the singularity container is that you can use the embedded terminal windows, which in turn are in the singularity container.
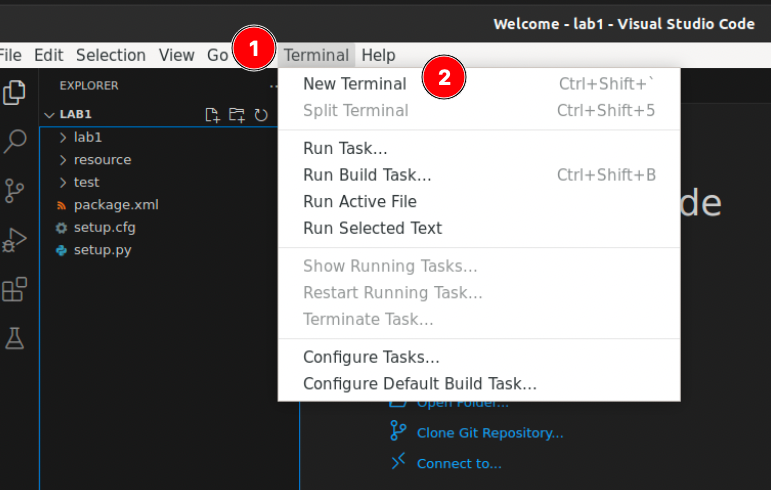
To open a terminal window follow the steps in the figure above, or use the keyboard shortcut shown in the image.
4.4.4. Managing terminal windows in Code
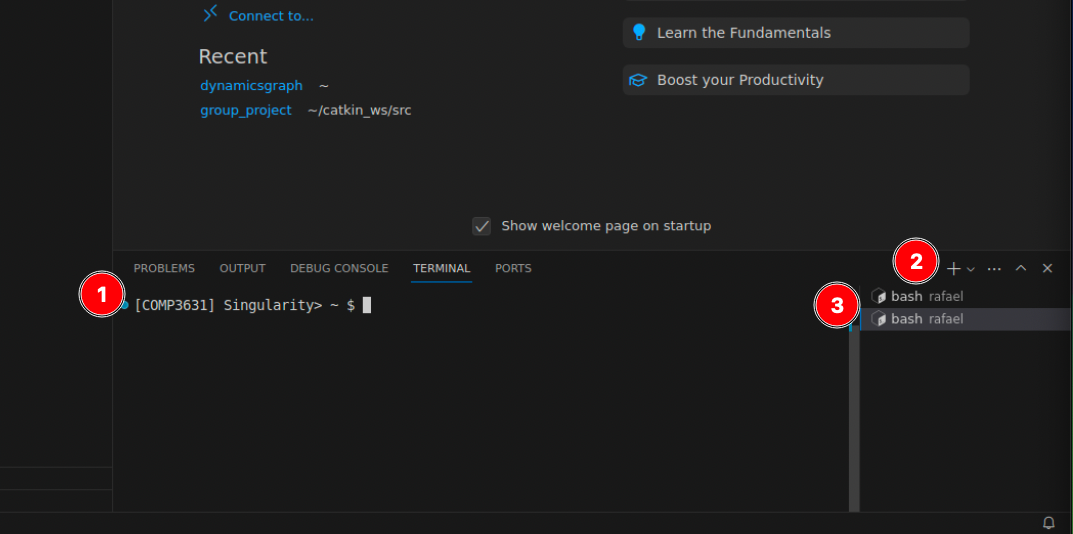
You can manage these singularity terminal windows within Code:
Note that (1) shows the
[COMP3631] Singularity>prompt indicating that these terminals are within the singularity container.Note that (2) shows a button to easily create new singularity terminal windows. You will need numerous such terminal windows in the future.
Note that (3) shows you a drawer of your running terminal windows, and clicking on them will let you switch between them.
4.4.5. Configure Git
Git is a powerful tool used for code version control. If you are not familiar with Git, please make sure to study lab 1.2. For now, we need to configure Git.
Open a terminal window and execute the following commands one by one (each line represents a distinct command). After typing the first command, press the ENTER key to execute it, then proceed to the next line, and repeat the process by pressing ENTER again to execute the second command.
git config --global user.name "xiao-wang007"
git config --global user.email "x.wang16@leeds.ac.uk"
Change the placeholder name and email to yours, obviously. The name and email will be used to “sign” your code changes and will appear in the git repository and on GitHub later on when you collaborate with other people.
The next configuration is crucial. While using Git, especially for collaborative work, you may encounter conflicts or automatic merges that require your attention. In such cases, Git will prompt you to inspect files or write a commit message to save the automatic merge. By default, Git uses Vim as the text editor for these tasks. Vim is a powerful terminal-based text editor but can be unintuitive for beginners due to its steep learning curve. If you are not familiar with Vim and would prefer a different text editor, you can change this default setting by using the following command:
git config --global core.editor code
4.5. Setting up your ROS environment
4.5.1. Create a GitHub account if you don’t have one.
For this module you will need a GitHub account. It’s free to create. If you don’t have a GitHub account yet, please head to github.com and create one.
4.5.2. Set up SSH key with GitHub
Before you continue with the following, you will need to set up your SSH key with GitHub, if you haven’t already. Here is how to do this:
In a terminal run:
ssh-keygen -t ed25519 -C "your_email@example.com". Replace with your email.Follow the instructions. It will first ask you where to save the key, just press ENTER to save to default location.
It will then ask you for paraphrase (twice to confirm). Type a password you will use to communicate with github. The text in the field is hidden, so you will type but nothing will be printed on the screen (but the program reads your password normally).
Run:
cat ~/.ssh/id_ed25519.pubto get the public key.Head to GitHub here and click “New SSH key” to create a new SSH key. As a title provide something sensible like “University PC” and paste the public key from the previous step in the “key” section. Finally, click “Add SSH key”.
The above should be configured once.
4.5.3. Test your ROS configuration
With all the new tools we learnt, we can finally glue everything together to
start working on this module. In ROS we need a working space (called ros2_ws
for short). As we said, ROS tools are only available within the Singularity
container. You need to do the following once for this module:
Open a singularity terminal in Code.
We need to create a directory in the home directory, let’s move there:
cd ~. Make sure you are there by runningpwdand ensuring that we are in the home directory.We need to create the
ros2_wsdirectory andsrcwithin it, runmkdir -p ros2_ws/src.Let’s move into the source directory,
cd ~/ros2_ws/src.Let’s clone the git repository for lab1, make sure you are in
~/ros2_ws/src. Then run:git clone git@github.com:COMP3631-2026/lab1.git lab1
Make sure the directory is there by running
lsand verify that alab1directory exists now.Go a directory back,
cd .., make sure you are inros2_wsby runningpwd.Run
colcon buildto build your ROS2 workspace. Note: Make sure you are at the root of the workspace, i.e.ros2_ws! Because this will generate the directories with files as in the next step. Messed up filesystem could make ROS2 complainMake sure that
build,installandlogdirectories are created next tosrc; runlsto verify.Now in the terminal run
source ~/.bashrcto apply the changes in this session.Verify that everything works by running
ros2 run lab1 hello. Do you get the greeting message? If so, well done, you configured your ROS environment successfully! If not, please check again as this means that you haven’t configured your environment correctly.
‘’’{note} Every time you modify the source code (i.e. the files in ~/ros2_ws/src), you need to build it. Then source the install as in the steps above. ‘’’
4.6. Remarks and Checklist
Congratulations on completing this worksheet! By the end of this session, please ensure that you have achieved the following:
You configured a text editor for Python and ROS programming.
You are familiar with basic terminal programs (e.g.,
ls,cd,pwd,rm,touch,mkdir, etc.), and if not, you completed the lab worksheet 1.2.You understand the importance of Singularity in this module and know how to use it to run code.
You configured your ROS workspace with a
ros2_wsdirectory in your home directory.You successfully executed the
ros2 run lab1 hellocommand.
If you have any questions or run into any issues, please don’t hesitate to reach out for assistance. You can approach one of the Teaching Assistants during their lab hours for immediate help or feel free to contact me.