Project overview
Contents
13. Project overview
Project Contacts: Xiao Wang(x.wang16@leeds.ac.uk), Yanlong Huang (y.l.huang@leeds.ac.uk)
Warning
Academic Integrity and Plagiarism - Notice
Please note that plagiarism detection will be conducted for both the reports and the code. Any instances of plagiarism will be reported for Academic Integrity. We expect that each student will independently work on the assignment, and that the solution will be the result from their own efforts. You are allowed to use sample code given during the labs and lectures without reference. You should, however, cite any other work that is not yours according to the University of Leeds’ referencing guidelines.
13.1. Assessment Overview
This project is summative that accounts for 10% of the mark. There are two submissions required:
1. your code in Python (`~/ros2_ws/src/ros2_project_xxx/*'), `xxx` being your uni account name.

2. a video demonstrating the robot performing the task.
please make sure the following are clear to see:
task world gazebo simulation showing your robot performing the task
navigation in nav2 showing your robot path planning
window display of your processed camera feed; make sure to show your detection of the RGB objects, either by using the filered view or original video overlayed with bounding box or circle.
13.2. Project Description
13.2.1. Project aim and objectives
The aim of the project is to apply what you have learnt in this module and think of ways to solve a robotic problem that requires the combination of computer vision and motion planning. You are required to write your own ROS2 code in python to let the robot perform the task autonomously in the simulation hosted by a simulator called Gazebo.
The objectives are as follows:
learn and apply the fundamental ROS2 framework for robotics systems
to apply motion planning methods
to understand and apply basic image processing techniques in autonomous robotic systems
The lab sessions are designed to fulfill these objectives as well as to provide you the necessary skills for the completion of the final ROS project.
Note
We offer the real turtlebot3 burger as well for you to play around and test your motion commands and image processing modules you have coded through the lab sessions. It is only formative, which is not accounted for your final grade of this module. From this week (as of 10/03/2026), we will bring the robot to our lab sessions. Feel free to ask for it.
13.2.2. The task
The robot should be able to move and detect the RGB coloured boxed (all three boxes). Please make sure all colours will appear in your camera view while the robot looks for the blue box, such that you can highlight the detection. When a blue box is detected, the robot should move up to the blue box and stop at roughly within a radius of 1 meter from the centre of the blue box Using the grid on the ground as a reference, each block in the grid is 1x1\(m^2\). Also the box is of 1x1x1 \(m^3\). The world looks like this:
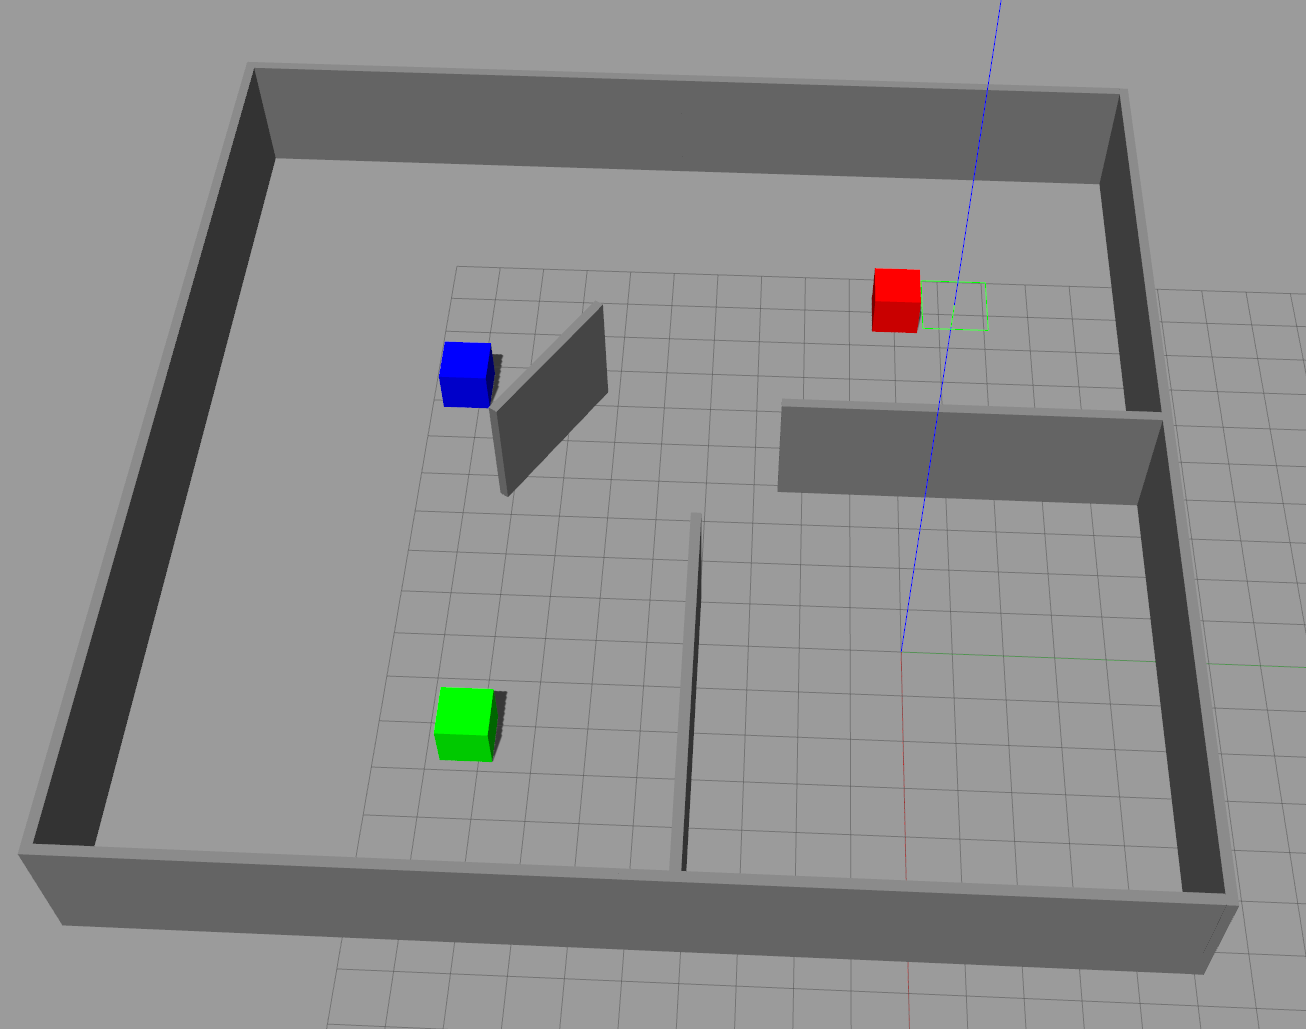
Task world: the robot’s starting position is located at the bottom right compartment.
13.2.3. What has been provided:
The map of the task world is provided in the following git repo:
Note
ros2 project - Instructions
In a terminal, go to
cd ~/ros2_ws/src.remove the old
turtlebot3_simulationspackage inside your~/ros2_wsclone the new
turtlebot3_simulations, which has the new world ready for you:git clone git@github.com:COMP3631-2026/turtlebot3_simulations.gitthen switch to the project branch by doing:
git checkout 2026_ros_project
Run:
git clone git@github.com:COMP3631-2026/ros2_project <space> ros2_project_xxx. withxxxbeing your uni account name.Note at the end of the the command:
git clone [...] ros2_project_xxxthe map is already provided in the folder you just cloned.
cdto the folder you just cloned, in the terminal, do:rm -rf .git. This allows you to push the folder to your own repo later.Now to form a complete package, copy everything in
src/lab5/tosrc/ros2_project_xxxTo make the file system consistent, change all the
lab5toros2_project_xxxin the following files:change folder
~/ros2_ws/src/ros2_project_xxx/lab5to~/ros2_ws/src/ros2_project_xxx/ros2_project_xxxchange the name of the file in
~/ros2_ws/src/ros2_project_xxx/resourcetoros2_project_xxxopen
~/ros2_ws/src/ros2_project_xxx/package.xml, changelab5in line 4 toros2_project_xxxchange the two appearances of
lab5toros2_project_xxxin~/ros2_ws/src/ros2_project_xxx/setup.cfgin file
~/ros2_ws/src/ros2_project_xxx/setup.py, change thepackage_nametoros2_project_xxx, and the corresponding entry points in line 21-24, just like what you did in previous labs. Just to reminder you again, your code in~/ros2_ws/src/ros2_project_xxx/ros2_project_xxxmust be consistent with what you put in theentry_pointsin thesetup.py.
Now you should have a complete package to build. Your code for the project will go to
~/ros2_ws/src/ros2_project_xxx/and its correspondingentry_pointsinsetup.py.After the new
turtlebot3_simulationsare built, you can load the task world by doing:ros2 launch turtlebot3_gazebo turtlebot3_task_world_2026.launch.pyOnce you have code it up. You have made a whole package named
ros2-project_xxx.
Note
Create a new repo and push to it
first of all, make sure you deleted
.gitafter cloning project repo from the above steps.go to your github webpage, create new repo with name
ros2_project_xxx.cdto~/ros2_ws/src/ros2_project_xxx, do the following:
    - git init                      # initialize git
    - git add .                     # adding everything in
    - git commit -m "first commit"  # leave a message, you can change the message
    - git branch -M main            # name the default branch to main
    - git remote add origin git@github.com:/ros2_project_xxx.git # set the head
    - git push -u origin main       # push your local codes to the server
13.2.4. Some hints:
motion planning helps you to explore the map if you don’t see any colours. The map is a massive collection of coordinates (your robot’s configuration space). How to reduce it for efficient exploration.
OpenCV provides functions to calculate the contour area from your colour detection, e.g.
cv2.contourArea(). Appearing as big or small relative to some threshold value, can inform the robot move forward or backward.you can also calculate the location of the CoM of the contour in the camera feed, e.g. with the help of
cv2.moments()such that to inform the robot to steer left or right.In the
def main():after the node has been initialized and put on the spin, then inside thetry:, there iswhile rclpy.ok():. Make sure whatever you need to do using your node (such as calling its member functions, checking on flags, etc.) are done under the while loop.
13.2.5. Specification and marking scheme (\(10\%\))
Your package builds and runs with no problem showing a complete package file system; even for a complete package but without all the functionality implemented for finishing the task. Empty submission will not be marked. (\(3\%\))
Use of motion planning, this means without detection of any colours, how do you move around to explore, i.e. how you choose the poses in the task configuration space (\(x\), \(y\), \(\theta\)) using the map information for navigation in nav2. You may use heuristics, i.e. from corner to corner; or use subdivision of the map into blocks, each of which is associated with a coordinate (\(x\), \(y\)) at its centre. Or random sampling coordinates across the map. Since there is no requirement on how fast you should complete the task, simply loop through your selection of poses will be fine. (\(3\%\))
Detection of all three RGB objects, highlighted with bounding box or circles; filter image showing the detection is also fine. 1 mark for each colour detection. Make sure the robot explores enough such that all three colours will seen by the robot. (\(3\%\))
Your robot finishes the task, and stays near the blue box roughly within 1 metre. (\(1\%\))
13.2.6. Submission instructions
For extra protection of personal data, please use google drive instead. Follow the steps below:
Compress your entire ROS project package into a
.zipfile and upload it to your University One Drive. This will generate a shareable link.Upload your video to your University One Drive as well, and generate a shareable link.
Add both links to the file titled “ROS project links”, and ensure that both are set to “People in University of Leeds.” and do not set an expire date.
13.2.6.1. Generating links for sharing file from OneDrive

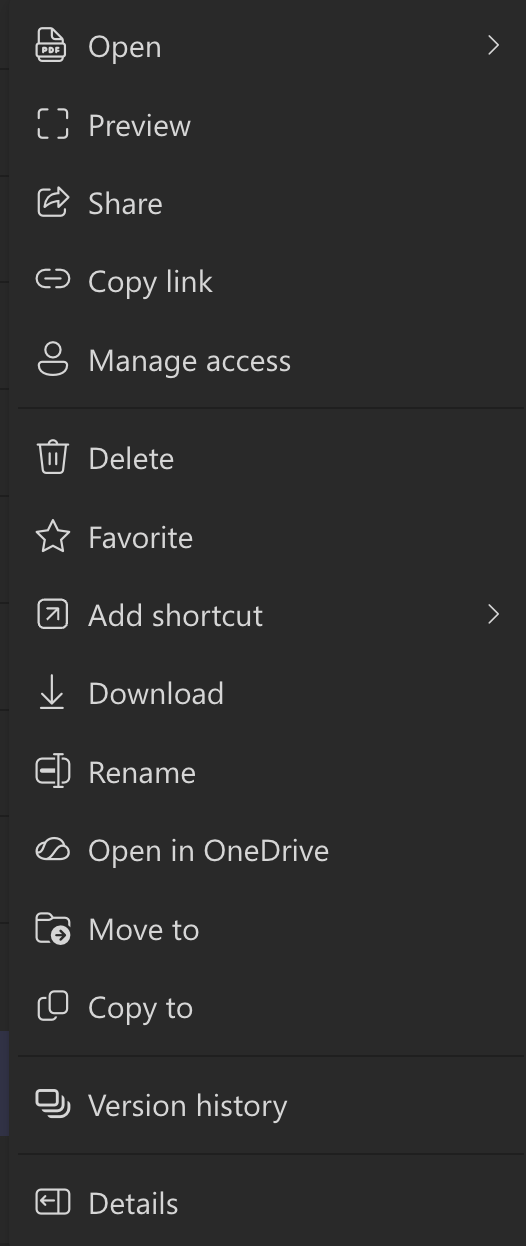
Step 1: find the file in your drive, right-click it (or click the 3 dots to the right of the file name)
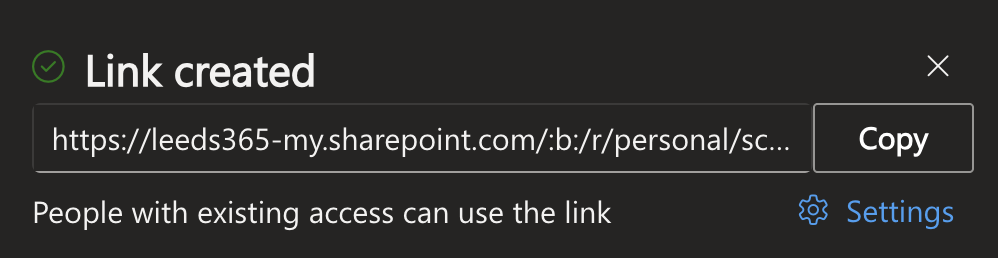
Step 2: select copy link
Step 3: click settings
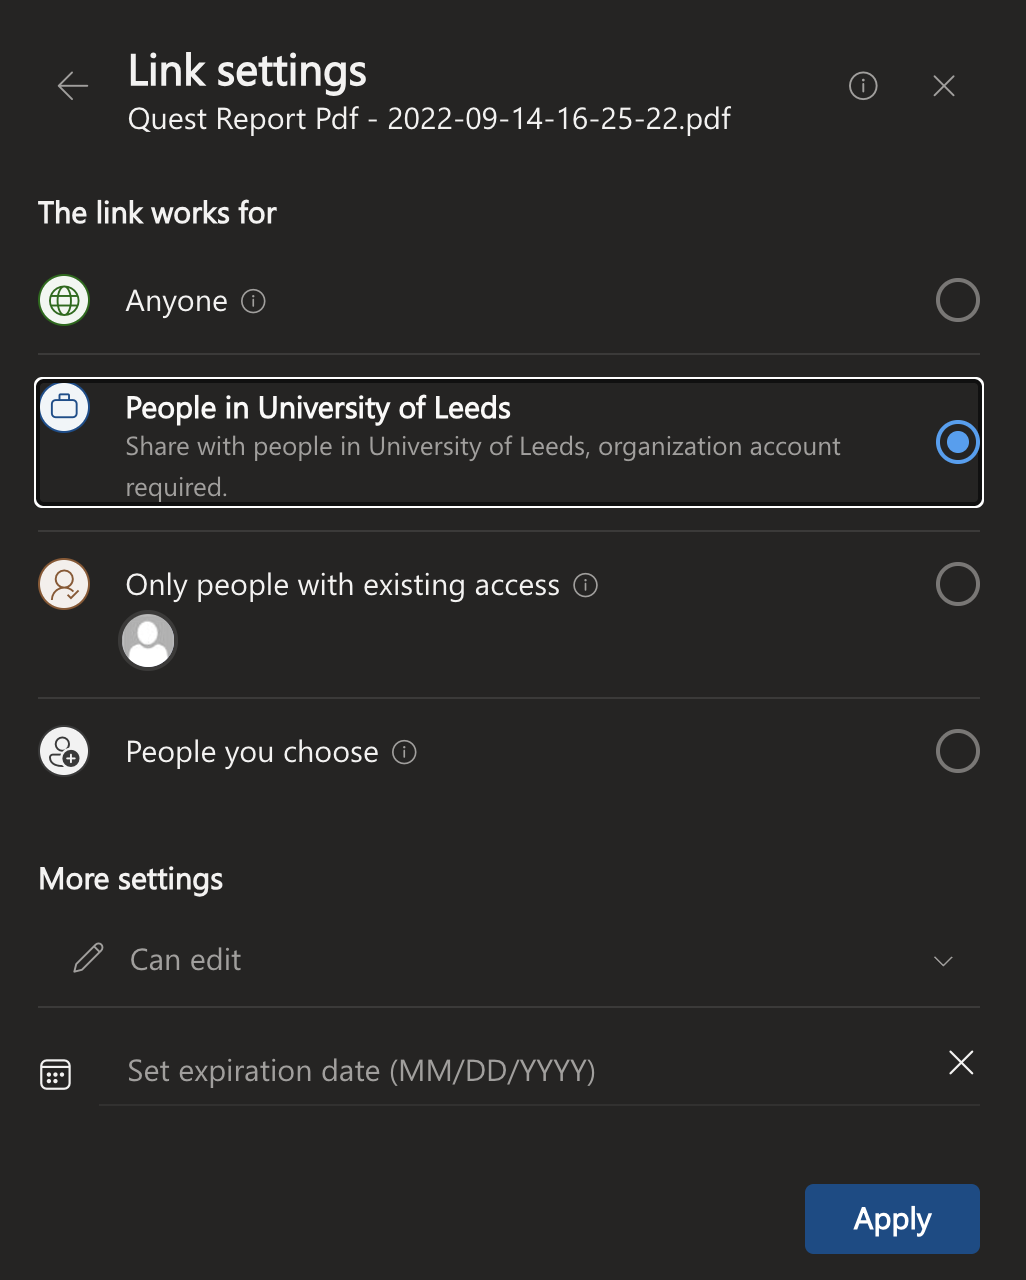
Step 4: set to “People in University of Leeds” and do not set an expire date. Then click apply.
13.2.6.2. Guidance on ros package file system (the entire ROS project)
A ros package has a file system like this, as shown below:
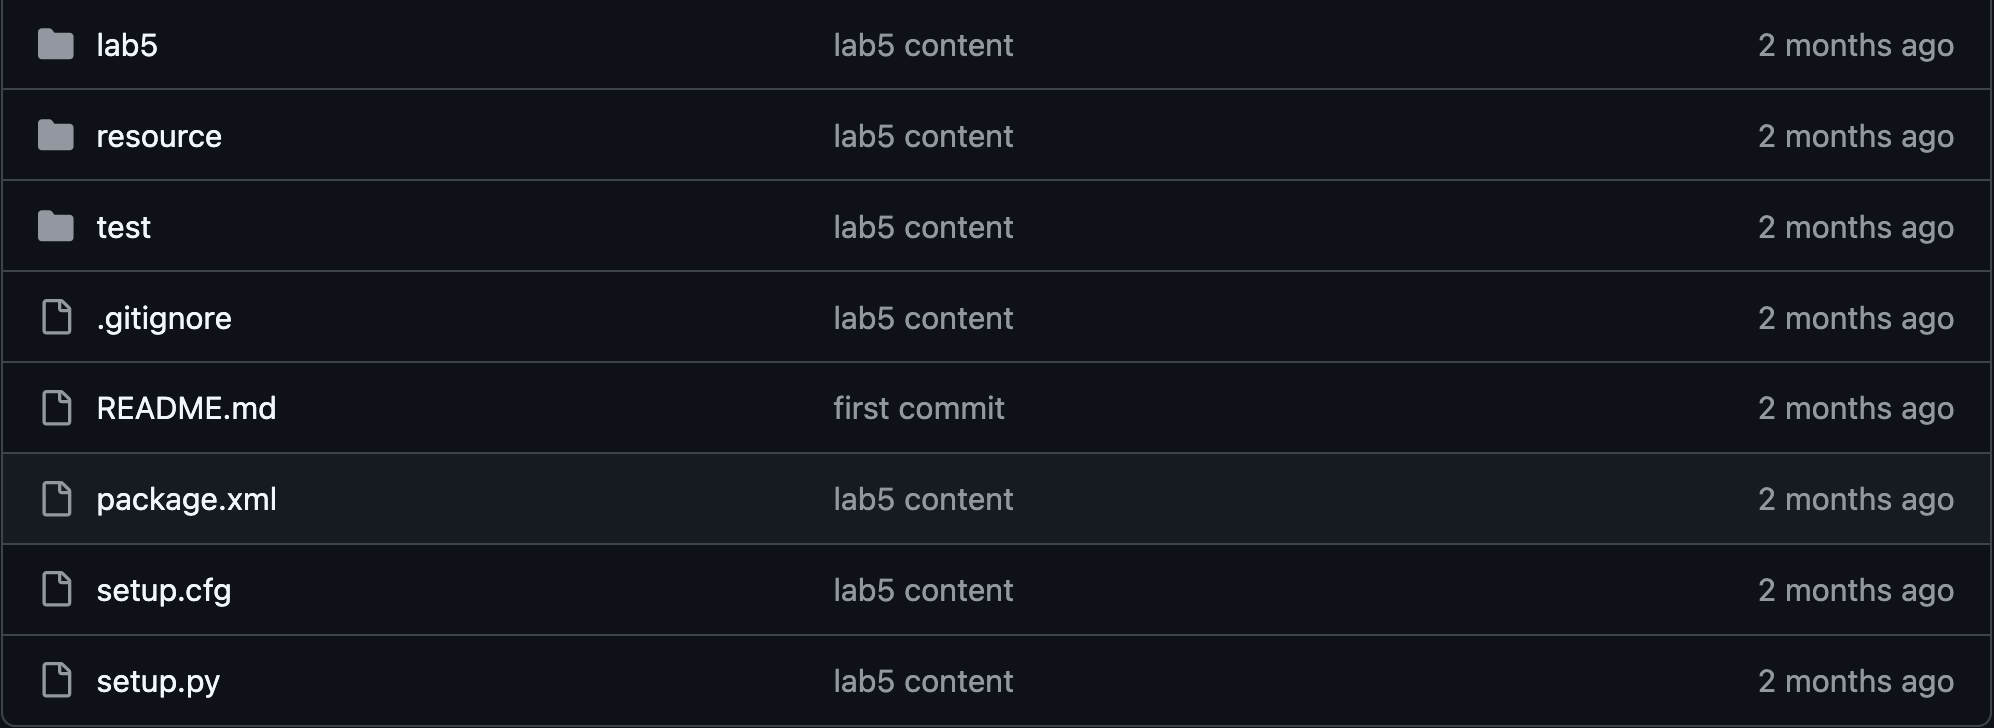
Illustration of the file system of a ros package using the package from lab5 as an example.
Using the sample code from lab5 as an example, the package name is called lab5. The package root directory is ~/ros2_ws/src/lab5. Inside the package root directory, you should have the file structure as shown in the figure above. For this project, your package is the entire directory (with everything in it) of ~/ros2_ws/src/ros2_project_xxx. Please compress the entire directory into .zip.